Saturday, November 2, 2013

DAY 15: Delicate


Finally got down to doing the delicate nails.

Took me quite awhile to think of a design and to find time to paint my nails.

Why I used a matte topcoat was because my regular topcoat dried up. But the matte effect was actually pretty nice, perhaps nicer than the glossy ones.

Thursday, August 1, 2013

Ice-cream Drip Nails


My friend, Jessica, found a photo of ice-cream inspired drip nails and asked me to try it out. And here it is! First I painted the base white and used OPI Suzi's Hungary Again to paint the tips. Using a dotter, I dotted the drips and attached them back to the painted nail tips. Using a small brush, I took the glitter from OPI Polka.com and placed them on the 'drips'. There you have it! Ice-cream drip nails.

Monday, July 15, 2013

DAY 14: Flowers


Finally got down to the flowers nails. I found a image online of coloured flowers on a light vintage brown background. I don't have a light brown, so I mixed white with a little of OPI Wooden Shoe Like To Know to get the base colour. Coated it with a gold glitter polish. Then painted on the coloured flowers.

Tuesday, July 2, 2013

Minions!!


Its minion madness once again with the new Despicable Me 2 film out in theatres. My friend posted a video tutorial and asked me to try it out. And here it is. Minion on my nail. Haha!

Check out the tutorial at https://www.facebook.com/photo.php?v=392361240884359.

Have fun!!

Sunday, June 23, 2013

Different Dimension Yours, Mine and Flowers


This is some amazing interesting beautifully fantastic glitter!! I used Essie's Mint Candy Apple as the base colour. This glitter contains consists of some micro glitter, pastel coloured glitter and pink flowers glitter. Its so simple to use! This polish belongs to my friend Jeanette. Thanks Jeanette! :D

Thursday, March 14, 2013

OPI Euro Centrale Collection

I'm really in love with the Euro Centrale collection. So crazily in love with this four bottles that I bought them all. At once. haha!! this is my first time buying four bottles from the same collection. And what's worse, at one shot. 


From left to right: Polka.com, Suzi's Hungary Again, You're Such A Budapest, Can't Find My Czechbook


 I haven't the time to try out the other two polishes yet, but here are You're Such A Budapest and Can't Find My Czechbook.

And finally! the other two colours!


Polka.com on Isn't That Precious (looks really sweet. designed by my bf. haha!)


Monday, March 11, 2013

DAY 13: Animal Prints


Leopard print nails inspired by my leopard print dog! Haha! OPI Can't Find My Czechbook (bought it from Nail Deck) as the base colour, then coat one layer of OPI Last Friday Night. Using a pink polish, draw dots or patches. Using a small brush, outline portions of the perimeters of the dots using OPI Wooden Shoe Like To Know?. Coat a layer of OPI Teenage Dream and apply topcoat.

Saturday, February 16, 2013

Magnetic Polish: China Glaze Get Charged


I received this bottle of magnetic polish (CG Get Charged) for my 22nd birthday. Its actually pretty simple to use. Paint the polish and hold the magnet above for 10secs. But there are some nails which didn't manage to get the pattern. I don't know why either. I'll have to try again another time, but overall its pretty easy to use. When you need quick fancy nails, this is it! :D


Saturday, February 9, 2013

Splattered Nails for Chinese New Year (2013)


These are my nails for CNY this year. Its pretty much the same as the previous set of splattered nails, just that I used colours to match my dress (the blue material in the background). I used Essie's Mint Candy Apple as the base colour and splattered black and gold polish using the straw. Sprinkle the teal coloured dried flowers and topcoat, done!

Tuesday, February 5, 2013

Flora Chinese New Year Nails (2013)


I intended to do a set of flora nails, but I thought that sticking the dried flowers on a plain colour itself would be too plain and boring for my liking. I remembered seeing a tutorial on splatter nails somewhere and thought that a combination of splattered nails and the small dried flowers would be pretty CNY-ish. (photos of the dried flowers below).

I used a white base so that the other colours would stand out. I placed some polish into a straw and blew it out onto the nails, but I have really bad aim, I kept missing my nails. Haha! So I had to keep trying. Sadly, a lot of the pretty splatter designs are on the news papers I placed my hand on. (Please remember to place something below your hand before trying the splatter method.) After that, I pinched out the flowers and sprinkled it onto the nails. Top coat and you're done! 


Tuesday, January 22, 2013

Vintage Flora Nails


Finally found the time to do my nails. I've bought this bottle of Essie some time ago but haven't the time to try it. I thought it would look beautiful for vintage nails and decided to give it a shot. First, apply Essie's Mint Candy Apple as the base coat (looks so refreshing!). Using a stripper brush and white polish, draw straight lines to create the stripes nails. For the roses, I used OPI's Japanese Rose Garden as the flower base colour and Revlon Red for the outlines. The leaves are CG's Glittering Garland.

I think you can easily find tutorials on how to draw the roses online. Its easier than it looks. 1) Use a dotter to draw patches of the lighter pink. 2) Using the red, outline the roses and draw some small curves in the centre for petals with a small brush. 3) Add on the leaves with a green. And there you go!

Tuesday, January 1, 2013

DAY 12: Stripes


My cell group's Christmas party was held after Christmas and the theme was candy canes! So I decided to do a candy cane french tip, which didn't go very well. Haha! I had problems controlling the brush to draw very thin lines. But here it is! Stripes challenge completed!

Tuesday, December 25, 2012

Green Tips This Christmas


French tips with mistletoe! :D This set of nails is pretty easy to create. Coat a layer of OPI Isn't That Precious, followed by a few coats of transparent minute gold shimmer. This would give it a slight shimmer under the light. Use CG Glittering Garland on the nail tips and use a stripper brush to draw a line across, below the green tips. Using a dotter, dot three red dots for the mistletoe. For the leaves, use a small brush to paint it on. And there you go! 

Tuesday, December 18, 2012

Christmas Nails!

Christmas is one of my favourite times of the year. There's something so festive and joyful about it. :)

Anyway, this year I had requests from my friends to do their nails for them, so I came up with a few rough designs, some with reference to online sources. 


This design is based on a snowy theme. There's a snowflake on the thumb, a snowman on the middle finger and icicles on the pinky. The alternate dark and light blue was my friend's idea, and it turned out really nice! I feel that the dark blue does give more contrast to the design. 


This set of nails was inspired by a photo of reindeer nails I saw online. I thought having the reindeer face on the nail was really cute. But I didn't want every nail to have a reindeer face, so I added the antlers. Initially, I left the middle nail a plain white, but my friend wanted the silver glitter stripes. Turned out it really looked more festive after adding the stripes. Both the pinky and thumb are just a plain brown (OPI Wooden Shoe Like To Know).

Sunday, December 2, 2012

DAY 11: Polka Dots


It was my bestie's 21st birthday yesterday, and her theme was polka dots. So I did this set of nails, for her birthday and it falls in line with the theme for DAY 11 of the nail challenge.

I first painted two coats of OPI's Isn't That Precious?, followed by a blue polish from faceshop on the tips. Using a dotter, I used OPI's Mummy Knows Best to create the dots. With a stripper brush, I used OPI's Last Friday Night (Katy Perry Collection!!) to line the tips. And TA-DA!! Polka dotted tips are born!

Saturday, November 24, 2012

Rilakkuma Nails


I have a few friends who are crazy about Rilakkuma and I thought it would look pretty cute on the nails. I've seen some shops selling files or notebooks with the Rilakkuma face like that and decided to try it out on my nails. I know many people have already done similar designs or maybe even the same, but I just couldn't resist trying it myself since my friends were so crazy about it.

The yellow polish is borrowed from my friend, Joanna, it's OPI Need Sunglasses?. The brown is OPI's Wooden Shoe Like To Know ? mixed with a little Need Sunglasses?. The cream colour is attained by mixing white polish with Need Sunglasses?. The orange is OPI He's My Boo.

I took the photo before I cleaned up the sides of the nails, so it is a little messy. The one below is taken after I cleaned up the sides and there you go. Rilakkuma nails!


This design actually looks better on shorter nails. For longer nails, I suggest drawing the faces horizontally instead of vertically. Else the faces would end up looking kinda long, which was the mistake I made. Who says short nails can't look pretty! :D


Monday, October 29, 2012

Halloween: Eerie Moonlight Nails


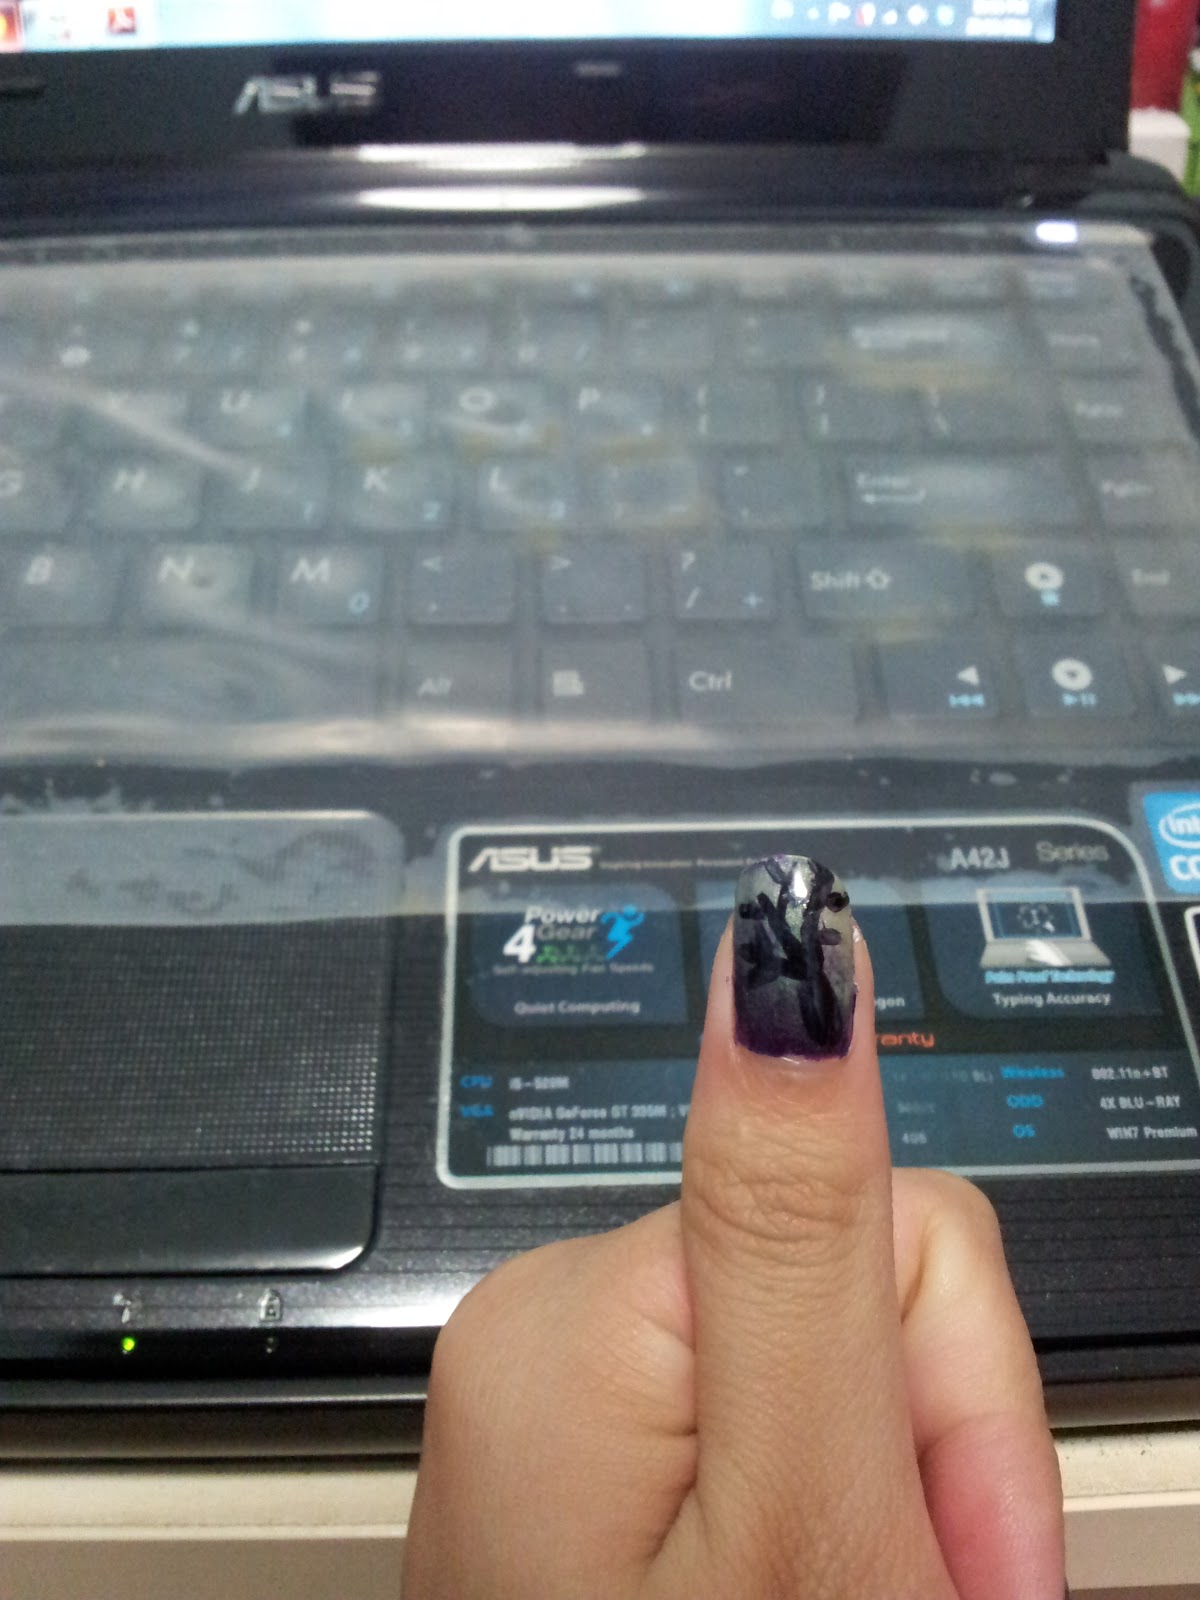
I wanted to create a look of the eerie moonlight so I used China Glaze's Bizarre Blurple, from this year's Halloween Collection, as a base colour. To get the moonlight glow, I mixed two colours together, a light yellow (from Etude House) and OPI's Let's See The Ring. Since the OPI colour is a pearl white, it gave this pearly yellow colour which is what I wanted for the glow. This was sponged onto my ring finger, which you can see is brighter than the rest of the nails. On the other nails, I sponged on a grey which I mixed by myself too. The same OPI colour plus black polish and I added a little drop of yellow. I intended to make a 'fog effect' but.... I guess it didn't turn out that well. I only drew the designs on after coating two coats of OPI's Zom-body To Love.


Ok. Here is my left thumb and my right thumb. On the left thumb is the sponged on yellow and the right is the grey. The yellow has a nicer eerie glow than the foggy grey.

Sorry about the drawings. I can't seem to paint the lines thinly, so the tree turned out kinda ugly. Maybe I should have used a stripper brush instead. And obviously I paint even worse with my left hand. :/
And once again, Happy Halloween!

Sunday, October 21, 2012

Halloween: Pumpkin Nails!


Time for some Halloween fun! We don't have the tradition of celebrating Halloween with pumpkin craving or 'trick or treat'-ing in my country, but there are events around (Example, Sentosa's Halloween Horror Nights).   Just for the fun of it, I decided to try some pumpkin craving nails. I had major trouble controlling the brush with my left hand, hence the thick lines/drawings. And yes there are two smiley faces, which I won't deny, were drawn because I really ran out of ideas.

I used OPI Spookettes collection for this set of nails. The orange base is He's my Boo, black is I Only Date Werewolves and the light orange lines is a pastel orange colour from Etude House. I actually coated a layer of the glow-in-the-dark polish, Zom-body to Love but the glowing isn't really obvious! Its really faint and it only lasts for awhile.


My friend was saying that my pumpkin faces were all cute, even the scary ones. So I showed her this one on my left hand, which I drew using my right hand. With better control, I attained a scary face. Wahahaha!!!! Happy Halloween!


Sunday, October 7, 2012

DAY 10: GRADIENT nails


Gradient nails! I decided to use an ocean-ish theme for the this set of gradient nails. The reason why there is only one lonely dolphin on my ring finger is because I actually dislike sticking 3D stuff on my nails. Firstly, I really doubt that this little dolphin is still gonna be there by tomorrow morning. Secondly, with 3D deco, washing my hair is a hassle!! It will get trapped and all when washing, plus the worry that it'll just fly off when I pull it through my hair.


I actually coated two coats of Zoya Maisie to give the nice fleck effect (ocean-ish look!), which isn't obvious in the first photo, but more obvious in this one. Its more obvious in actual. And here it is, gradient nails, wrapping up the 'colour segment' of the 31 Day Challenge.


Here is what I used.
From left to right: OPI Let's See The Ring, O2 Skin Nail Polish, 3 blue Faceshop Nail Polish and Zoya Maisie.


Sunday, September 23, 2012

DAY 9: RAINBOW NAILS


Yeah! Finally I had the time to do my rainbow nails. I used OPI's Let's See The Ring as a base colour and sponged on 6 pastel shades. Pink, blue, orange, yellow, green and purple. Topcoat it and here it is! Kinda reminds me of the paddle pop ice cream...